"You can run, but you'll only die tired." - Boba Fett
For those of you who have been under a rock for the past four decades, Boba Fett is one of the galaxy's most deadly bounty hunters. He works for Jabba and is looking for Han Solo in the Star Wars series.
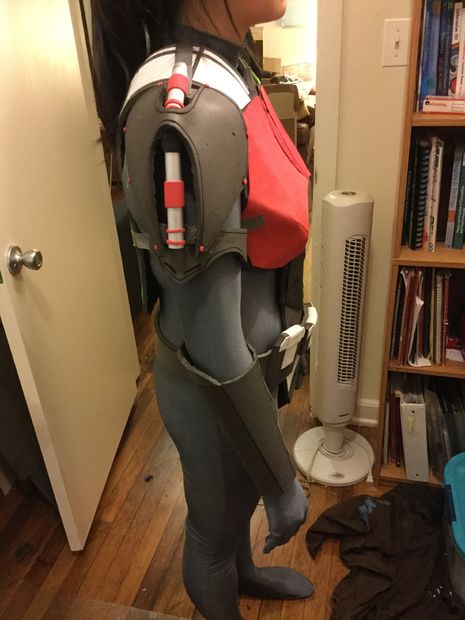
For the 2016 Chicago Comic and Entertainment Expo (C2E2), my friend and I decided to create a female Boba Fett costume for her. We wanted to make it look tough, but still have that female allure to it. Let's get started!
Materials
- EVA foam
- Shoes
-plastic buckles
-Elastic
-Measuring Tape
-Craft foam
-Sharpies
- Metal L square ruler
-metal yard stick
-chalk
-Hot Glue
-Modge Podge
-kwik seal caulk
-shoe strings
-duct tape
-Dowel rods
-masking tape
-Cardboard
-comic cardboard
-metal split fasteners
-Giant roll of paper
-Hot glue
-Superglue
-soldering iron
-Dremel
-Sander
-exacto knife
- heatgun
-brown fabric
-PVC pipe
-grey zentai suit
-metal pipe
-worbla
-Thermoplastic beads
-bondo
-Empty peanut butter jar
-clear plastic/ plexiglass
-hole punch
-wood trim
- window tint
-peanut butter jar
-bottle caps (various sizes)
-wooden dowel rods
Step 1: Design
Before I ever start ANY costume, I look up a ton of reference photos from various sources and put it in a folder. The more pictures from different angles, the better. For this particular build, we combined a few different sources, but mostly incorporated things from the Boba Fett Kai action figure. We wanted to figure out ways to make the suit look fierce, but still have some type of femininity to it.
Look up:
1. Actual photos of the character from its source (movies, comics, action figure, etc)
2. Cosplay pictures. You can see what has been done, what you like, what you don't like, how to improve on a design. You can also start getting an idea of different poses you think you'd like to do.
3. I start looking at art work. I usually look up things via google images, deviant art, tumblr, etc. This way, you can see different renditions of a character through a new perspective and once again, start thinking about what you like, don't like, etc.
4. Use your own imagination. Think about what you want, how to make it your own original design, what are some tricks you think you'd like to incorporate.. perhaps you want to try out a new technique with this build, etc
Optional:
4. If you can draw, I sometimes will take all my reference sources and start drawing out my own design.
Step 2: Chest & Back Pieces
CHEST
1. Grab your measuring tape and then your giant roll of paper.
2. Measure from shoulder to approximately belly button, and then one side of chest to the side (under armpits). Transfer those measurements to the piece of paper and cut out that rectangle. I decided to make the chest and abdomen two separate pieces.
3. Fold the piece of rectangular paper in half and start drawing out your design. Make sure you draw enough room for the neck, and armpit. Sometimes, i like to make the abdomen a little slimmer. We went with a slimmer abdomen to make it a bit more effeminate. At this stage, i am taking the paper drawing, cutting out the main shape and then holding it up to the person to play with sizing (pic 1, not from this build but premise is still the same.)
4. once satisfied, i transfer the design onto the EVA foam with the sharpie and i cut it out. (pic 2)
5. I wanted to create a bust for the build to once again, make it more feminine. I wanted to incorporate some folds in the chest piece, so i took flipped over my EVA foam and used my soldering iron to burn some grooves where the folds needed be. (pic 3)
6. You will fill in the grooves with hot glue, fold the foam where those grooves are, and wait for it to cool. Sometimes i will glue in pieces of fabric to the seams on the underside of the EVA foam to make the pieces more secure.
7. If there are layers for the build (like making a 6 pack for the abdomen or pec pieces, i will cut each individual chest piece out of the paper design, transfer the outline to the foam, cut out EACH individual layered piece from the foam, sand off the tread from the back of the foam pieces and glue in the designated spot (pic 4-6, not this build but showing technique)
8. For this specific build, i chose to cut out the layered chest pieces from craft foam to instead of EVA. (pic 7)
9. For the abdomen, I took my paper design, transferred it to EVA, solder ironed and hot glued the grooves in the back of the foam, and then hot glued the craft foam on top to make layers. (pic 8)
10. I glued the chest piece to the abdomen piece. (pic 9)
BACK
1. Repeat the whole process and create the back piece. Pic 10 shows the design of the back piece.
SHOULDERS
1. I place the chest and back piece on the person and wrap shoe string around the person to hold the pieces in place while i work.
2. I take a strip of EVA foam and place it underneath the chest and back piece at the shoulder. Draw out the piece you need with sharpie and cut it out. From there, I take that shoulder piece of EVA foam, flip it over and trace out a duplicate for the other side, and glue both sides in to the chest and back pieces. (pic 11)
3. I glued in some layers around the shoulder straps (pic 12 + 13)
Sides
1. i create some straps from EVA, glue them into the sides and secure with fabric on the inside of the suit.
2. Glue in your black plastic bucks (pic 14)
Step 3: Shoulders
Right Shoulder
1. Grab your measuring tape and then your giant roll of paper.
2. While wearing your newly created chest piece, measure from shoulder to approximately bicep, and then one side of arm to the other side. Transfer those measurements to the piece of paper and cut out that rectangle.
3. Fold the piece of rectangular paper in half and start drawing out your design on one half of your paper. Cut out of EVA foam (pic 1)
4. use your heating gun and bend the shoulder piece into the shape you want it. If it does not want to stay, you can cut a slit into the back of the foam and insert unraveled paperclips in them to help them retain their shape. (pic 2)
5. Using your exacto knife, cut in the lines that you wanted etched into the armor. You do not have to cut entirely through the foam. Once you got the lines cut in, apply heat from your heat gun to expand the lines. Then, I took a hole punch and punched out a few circles from craft foam and superglued them in also. (pic 3)
5. I had a broken camera tripod and i cut off the metal legs to use as pipes. Cut them down to the appropriate sizes. (pic 4)
6. Cover the pipes with strips of craft foam to create some texture to the pipes (pic 5)
7. I took some thermoplastic beads, heated them up and jammed them in-between the two pipes to create a "joiner" piece. You can use worbla if that is what's available. (pic 6)
8. Glue the pipes in underneath the foam. You may have to glue a few little foam pieces in-between the spaces for everything to connect well.
Left Shoulder
1. Repeat steps 1-6 of the right shoulder, but obviously changing your design to match the left shoulder plate. (pic 7)
Arm bands
1. Repeat steps 1-3 of the right shoulder.
2. I wanted a little edge on each arm band, so turn it over, use your soldering iron and burn in a groove. Then fill with hot glue and bend at the groove to create the edge. (pic 8)
3. once you put in your details (etch in your lines and superglue your craft foam holes), you can secure the arm bands to the shoulder pieces. (pic 9-12)
Step 4: Forearms and Hand Guards
Forearms
1) Get your scratch paper and cut out a rectangle that will be the length of inseam of your elbow to your wrist.. the width would be enough that it can overlap.
2) wrap the paper around your forearm. Adjust as needed for the length. You want a good ranger of motion here.
3) Since the paper is around your forearm, you can cut it to fit your arm pretty snug.
4)Transfer the template to EVA foam.
5. Heat the foam around the arm and once cooled, You have your "base" for the forearm.
6. The left and right forearms are different so you will have to study them. I measured out the forearms, drew my designs on scratch paper and cut out of EVA foam. You will have the sand off the bottom tread from the EVA foam as you will be gluing them onto the base. glue in your elbow covers and designs.
7. Right Forearm - everything is fairly self explanatory. The only thing that is a little different is that i created little pipes/wires running down this forearm. Basically i took long strips of EVA foam and sanded off the edges with my dremel to make them into curved "wires" (pic 2-5)
8. Left Forearm - The left forearm is also self-explanatory. The difference is that i created a little channel in a long strip of thick EVA foam, and then took a little piece of PVC pipe and stuck it to the end to create a nozzle. (pic 6-10)
9.Glue in your your plastic buckles on each forearm. (pic 10)
10. Your gauntlets should be done now. (pic 11)
Hand guards
1 I created hand and thumb guards for the build. (pic 12). Take your paper and draw out your template. transfer to EVA foam and sand off the back tread.
2. Use your soldering iron and burn grooves into the back of the foam so you can bend the pieces to create ridges where you'd like them. For the hand pieces, i did more of a "accordion" type of groove.
3. Cut in your etching and use your heat gun to expand the lines.
Step 5: Cod Piece, Belt (pockets and Accessories) & Thighs
Codpiece
1. measure your waistline and cut a strip of EVA foam that size. I usually just use the width of the ruler i am using, which is 1.5 inches.
2. Create your codpiece by measuring the sides of your groin and how long it needs to be. Transfer the measurements onto paper and then onto foam
3. I wanted to create an edge so i used the soldering iron to burn a groove down the back of the codpiece. place hot glue in groove, hold the codpiece in the position and wait for glue to completely cool (pic 1)
4. Add your details. I used some craft foam to add little sections to the codpiece here and there. I used the soldering iron to create some burns and then use the hole punch to pluck out some pieces(pic 2)
5. Find the center of your belt strap and glue the codpiece there. The seam of the belt will be in the back, and that way, it will not be shown in pictures (pic 3) I sometimes take some fabric and glue it onto the seam of the codpiece and the EVA strap to make it more secure.
6. the base of the belt should be done at this time (pic 4)
Belt pocket and accessories
Pockets
1. To make your pockets, draw out your template from paper
2. Transfer the template onto the EVA foam and sand off the tread from the back. (pic 5)
3. Use craft foam to create a raised lip for your pockets (pic 6)
Canisters
1.Take some PVC pipe and cut them to length.
2. drill holes on the sides of each pipe where you can stick metal fasteners through them. (pic 7)
3. create tops for the pipes with thick EVA foam, and then wrap strips of craft foam around the pipes to create texture. (pic 8)
4. attach the pipes onto the belt strap itself by inserting the metal fasteners through some washers on both sides of the strap. (pic 9)
5. Your belt should be done at this time (pic 10 + 11)
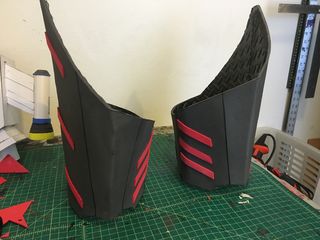
Step 6: Thighs
1. Measure the front of your thigh and create your template from paper. (pic 1)
2. Transfer and cut out of EVA foam. I used a soldering iron to burn the groove in the back so i could create the edge in the front of the thigh (pic 2)
3. Do the same first 2 steps the back of the thigh and then glue ONLY ONE SIDE of the front piece and back piece together (pic 3)
4. Try on the thigh piece by wrapping it around your actual thigh. Use a sharpie and mark on the foam where you want the other side to join. Hot glue side together (pic 4)
5. Add your detailing to the back (pic 5) and to the front (pic 5)
Step 7: Shoes, Shins, and Knees
Shoes
1. Measure the sizing that you would like for your heel. Cut out of EVA foam and hot glue directly onto the back of the shoe. (pic 1)
2. Cover the shoe with masking tape and start drawing on the tape directly. Once satisfied, carefully use your exacto knife and cut away the access tape you
3. carefully remove each masking tape piece and transfer onto EVA foam. Each of these masking tape pieces are now your template. (pic 2)
4. Sand off all the tread from the back of the EVA foam, add any etching, and glue directly onto the shoe (pic 3)
5. Repeat the process for each shoe section. (pic 4 +5)
Shins
1. Measure the front of your shin and transfer to paper.
2.use your paper template to cut out your EVA piece (pic 6)
3. repeat the process for the calve part of the shin cover and similar to the process in of the thighs in the previous step, join the two pieces.
4. Once you have your calve "tube", you can start adding your details (pic 7)
5. Your shin pieces should be done at this time. (pic 8 +9)
Knees
1. draw out your shape from paper and transfer to EVA foam.
2. heat up your knee piece and once warm/ soft, push it into a deep bowl and allow to cool. (pic 10)
3. Once cool, remove and start adding your details with etching and layers of craft foam.
Step 8: Knives and Sheaths
Knives
1. Draw out your template of your knife (pic 1)
2. cut out 3 cardboard pieces of your knife. 1 is the FULL shape of the knife, and 2 cardboard shapes will be missing the blade part of the knife. (pic 2)
3. Glue your three pieces of cardboard together with the FULL shape in the middle (like a sandwich)
4.use your paper template as your guide and cut out the blade of your template from comic book cardboard. You will need two for either side. Glue in the comic cardboard onto the blade of your cardboard knife. (pic 3)
5. Glue comic cardboard onto the handle of the knife. (pic 4)
6. Now this is the tedious part.. Take your hot glue gun and start creating the blade of the knife. Slather the edge of the cardboard knife with hot glue and use the tip of the glue gun to spread the hot glue along the end of the knife. (pic 5)
5. once you have the basic shape of the edge, you will take strips of the comic cardboard and use it like sandpaper on the hot glue blade to get it smooth. This is a process so just be patient with it. Furiously rub the hot glue with the comic cardboard and the friction will cause the glue to smooth out eventually. add glue to holes, rub down with comic cardboard and just repeat till you are satisfied. (pic 6)
6. Once you are happy with the blade, you can start adding more details to the blade handle. don't forget to glue comic cardboard to the back of the blade itself. (pic 7)
7. Your knives should be done (pic 8)
Sheaths
1. For your sheath, you are essentially creating a box. Take your measurements now that you have your knife, Draw your template out, and cut your cardboard
2. Once you have the back of the sheath cut out, glued, and covered with comic cardboard, Glue in some washers and insert your metal clips. You will essentially repeat the process you did with the canisters on the belt. (pic 9)
3. Glue in comic cardboard on the inside of the sheath so that the knives slide in well.
4. Create your sides and the top of your sheath (pic 10)
5. create your lids for the sheath (pic 11)
6. Create any details you want (pic 12)
Step 9: Gun
1. Draw out your full sized gun (Side view) on paper. I always use a straight edge with this job. The more details you can add, the better in the long run. (pic 1).
2. Cut out the entire design (pic 2)
3. After looking at the gun, it seemed that the best way of tacking it was to make the gun in two pieces. So i cut the back of the gun off and used the paper template to cut out two pieces (1 for each side of the gun) (pic 3)
4. Figure out how wide you want the gun to be. From there, make a stack of cardboard and glue them in various parts of the inside of the gun. This will allow the gun to be hollow (to reduce weight), while still being study and not caving in on itself (pic 4)
5. Glue the two sides together now (pic 5)
6. use cardboard to create the perimeter of the gun (pic 6) This is now the "base" of your gun.
7.Now, you will determine which sections of the gun will be layered on top of each other. If you want the base to be layer "1", then use your comic cardboard and glue it on that section. (pic 7)
8. Use your paper template and start tracing out the next layer to put on top of the base. Cut out of cardboard(pic 8)
9. When doing the butt of the gun, glue on your layer of cardboard. (pic 9)
10. If you want to create an angled ridge, you can use hot glue and the tip of the glue gun to create a beveled ledge. (pic 10)
11. For the bottom pipe of the gun, I used a leg of a damaged camera tripod. I cut it to length and inserted it into a slot i made (pic 11)
12. Just keep adding layers to the gun. This is why it is important to draw as many details into the gun as possible. You can lay the sections of paper in their designated area to help you visual how things are going(pic 12-14)
13. Once you get the lower half done, it should look like pic 14. You can now move to the front of the gun.
14. For the barrel of the gun, i got a long piece of PVC and cut it to size. Then, i cut out long strips of cardboard and covered them with comic book cardboard to glue around it. (pic 15)
15. Use your template and create the housing for the barrel of the gun. (pic 16)
16.now glue the front of the gun to the back of the gun (pic 17)
17. You are approaching the end of the gun, so see how the size is working out for you (pic 18)
18. for the scope, we used more pipe from the broken camera tripod, some bottle caps, EVA foam, and some strips of craft foam. ( pic 19)
19. create a little housing piece for the scope on top of your gun (pic 20)
20. Get a PVC joint piece and attack it to the end of the barrel. Decorate with craft foam (pic 21)
Step 10: Backpack
1. We wanted to make the backpack hollow so that we could house things like keys, wallet, phone, etc.. Use your reference pics to see what you are getting into first Pic 1)
2. Start out by measuring the area on the back and drawing your template on a folded piece of measured paper (pic 2)
3. Cut the front and back of your backpack out of cardboard (pic 3)
4. Figure out how wide you want the backpack to be and glue in your cardboard sides (pic 4). You now have the "base" of the backpack.
5. Similar to the gun, you are just adding layers. If you want to add the base as a layer, add your comic cardboard to where you want the lowest section of the backpack (pic 5)
6. Start adding on your layers. Use your reference pictures and your drawing to be your guide. (pic 6,7,8)
7. We secured the backpack onto the foam chest piece by using wing nuts, washers, and bolts. (pic 9)
8.We created the thrusters on the backpack with some cardboard. Just remember to always create a pair, because you need it to happen on both sides of the backpack (pic 10 +11)
9. start creating the wings that out of of the base of the backpack. I used two layers of cardboard to add strength to it. Cross cross the cardboard when you are building so the "grain" of the cardboard isn't going in the same direction (pic 12)
10. Cut slits from the sides of the base (pic 13)
11. Glue the wings in (pic 14)
12. There are these little accessories on the backpack. I had some dowel rods i carved with my dremel that i glued into some bottle caps. (pic 15)
13. Inside the thrusters, there are cylinders inside. First cut out a circle from cardboard and wrap the edge of the circle with cardboard to make a cylinder. Then cut it at an angle (pic 16)
14. cover them with comic cardboard, Glue the cylinders in, and add any more details (used bottle caps for the bottom. I also used a larger jar lid and glued it into the bottom of the backpack. (pic 17)
15. This is where the backpack should be at this time (pic 18)
16. cut two pieces of PVC to size for the rods on the ends of the "wings" of the backpack. on one end, cap them with EVA beveled foam and craft foam. (pic 19)
17. Now use your dremel and cut out a slit so the wing can fit inside of it (pic 20)
18. Once the PVC ends are glued in, you can create the bottom cap. I glued two EVA circles together and then beveled the entire thing. I decorated with a strip of craft foam (pic 21 +22)
19. For the antenna thing (which will be made from PVC pipe), first take your peanut butter jar and cut off the top ring (clear) and cap (Blue) (pic 23)
20. You are now going to create some circle spacers from cardboard that will fit inside that clear top ring. Find the center of it circles and cut out a circle to fit the PVC pipe in all three. (pic 24)
21. Glue the circles inside the clear ring of the peanut butter jar. (pic 25+26)
22. Take the cape of the peanut butter car and dream off the surface so you will have a ring. (pic 27)
23. Glue the PVC pipe into the clear ring and it SHOULD be able to screw into the top blue ring. (pic 28)
24. Glue the blue ring into the top of the backpack and glue in cardboard corners around the ring (pic 29)
25. You should now be able to screw the top (antenna) into the base of the backpack (pic 30 +31)
26. Now that you have the PVC antenna into the backpack, cut out EVA foam circles and glue them together, some of these will be 3 layers, some will be 2 layers. (pic 32)
27. Put the EVA foam rings on the antenna on the PVC like a totem pole. (pic 33 + 34)
28. Your functional backpack should be complete (pic 35)
Step 11: Helmet
1. Start by take a strip of cardboard and wrap around your head. Do this loosely, as this will be the circumference of the helmet
2. Make a cross section that goes from the front of your head to the back, and then from side to side. Then add diagonal pieces till you have a crown (pic 1)
3. now insert triangles into the sections until you have a full cap (pic 2 and 3)
4. Start adding your details like the front face, back, and sides (Pic 4,5,6)
5. Now bondo the ENTIRE helmet and sand until it is fairly smooth (pic 7)
6. Cover the entire helmet with masking tape and draw your design on it ( pic 8)
7. Similar to how you put foam on the Shoes, use your masking tape as templates for the foam. Cut out the foam, sand if there is tread, and glue directly onto the helmet (pic 9 + 10)
8. Create your antenna by using a piece of wood trim and gluing it into an EVA foam base. Glue into the helmet itself (pic 11)
9. Grab your plexiglass and bend it slowly using your heat gun. Then, attach your window tint to the plexiglass and glue it into the helmet.
Step 12: Battle Damage, Paint and Attachment
1. Now here is the Painful part... After all that hard work to make everything look so crisp, you are going to Scuff it up with your dremel to make battle damage. Boba Fett has seen some things so his suit is going to be damaged and dirty.
2. Paint everything the base colors such as forest green, silver, red, etc. (pic 1)
3. Around the "damaged" parts of the armor, you can take silver paint and paint around the edges to show some scuffing. (pic 2)
3. Apply a light water black paint solution to each piece of armor, gun, knife, etc and wipe off IMMEDIATELY. This should cause a dirty look. Repeat until satisfied.(pic 3)
4. Paint on your emblems (pic 4+5)
5. Glue elastic to the thigh pieces and the shoulder pieces. Then glue the thighs into the belt and then the shoulder into the chest piece. Glue elastic onto the knee pads so they can wrap around your knees as well. (pic 6)
6. Similar to how you attached the canisters onto the belt, you can attach the knife sheaths onto the thighs or even boots if you'd like.
7. Take your brown fabric, tater it up, make it dirty, and attach to the shoulder via clips
Step 13: FINISHED!!
If you are interested in star wars costumes, please go to here: http://www.cosjj.com/costumes/movie-tv-costumes/star-wars