Wednesday, 16 August 2017

Cymbal Monkey Toy Costume Tutorial

Remember those cymbal clanging mechanical monkey toys? Okay, maybe only my parents were that demented. I had one. I thought it was creepy even then. So, it is time to bring back a classic. They're so hard to find now! The jaw and eyes on mine actually move! And I have cymbals and over-extended arms. It's disproportionate and creepy. It was a hit. Video above

Step 1: Paper Mache and Foamular


 To the uninitiated, foamular is a wonderful material. It's carvable, sandable and paintable. You can glue it and screw it. It does compliment paper mache well because it's so light. I cut the dimensions out after using calipers on my monkey model. I then used wire mesh to get my round shape before paper mache. After a few layers, I added wood filler and sanded smooth. It's an old toy. It doesn't need to be perfect. Bring out the eyebrow ridges and blend all the forms together to get away from the 2D look of the face. Although, monkey faces are sort of flat. (Reference: President Trump)

Step 2: Painting and Jaw/Eyes!


 Now things get really disturbing. I used a flat acrylic because it looks worn/old. Freehand the teeth. It looks more vintage that way. Luckily I had a friend to do that. I'm not confident in my drawing. The eyes are just plastic containers I found at a crafting department store.

The jaw is just 2 U-shaped pieces of foam with anchored wood dowel through them. The mechanism is just rubber bands and string. A fairly simple puppet!

Step 3: Skin and Fur (and Hands!)


 And even more disturbing. I picked out the closest fabrics at the fabric store. The face is a stretchy material. I used spray adhesive and went to town on this thing. It takes a lot of patience and time. Be careful around the jaw. You must use latex paint primer on jaw to prevent it from melting. The back of the head is just made from hot glued cardboard.

The hands/arms are foamular cut and carved to look right, then fur was added.

WARNING!

Really hot in these rhinos! This thing gets warm inside the head. AND the cardboard gets soft. I recommend using foamular and making vents for yourself.

Step 4: That's It!


We have a cosplay company. We have been making cosplay costumes for worldwide costumes since 2003.

If you want to buy movie costumes or some other anime cosplay costumes, just contact me.

Email: info@cosjj.com
Website: http://www.cosjj.com/
Costumes: http://www.cosjj.com/costumes

Tuesday, 15 August 2017

Pirates of the Caribbean 5 Makeup Tutorial

Hey whatsup! in this little tutorial i'm going to show you how I created this look inspired by the movie poster of the 5th Pirates movie!

Step 1: How To: Pirates of the Caribbean Makeup!


 If you want to see a short video on how I did this, or want see more of my work you can follow me on instagram! @Mirandavanr :)

Step 2: Trace Your Face
 For the first step it's probably the best to trace out where the skull part of your face will be. i did this using a nyx eyebrow pencil. I wanted the socket, nose, and jaw of the skull to show so i traced about half of my face

Step 3: Adding Foundation

 if you have troublesome skin like me, or just like foundation then this is the time to apply it. You could apply it over your entire face but since half of it is going to be covered up in paint anyway that would be a shame of product so i just applied it on the 'normal' side of my face

Step 4: Fill in Your Eyebrow
 Only one eyebrow is going to show so i'm just filling that one in with the same nyx eyebrow pencil.

Step 5: Create a Smokey Eye
 i know this all isn't really neccesary for the skull part but since it's still a pirate look I went for a dirty smokey eye. I feel like that gives the pirate vibe better rather than just skipping it and only doing the skull part

Step 6: Don't Give Up You're Halfway There!


Now the fun part begins :)

Step 7: Tracing the Skull


 Taking, once again, my nyx brow pencil i'm tracing the skull lines so i'll know where not to paint in the next step. (inside of jaw, eyesocket)

Step 8: Creating a Base Colour
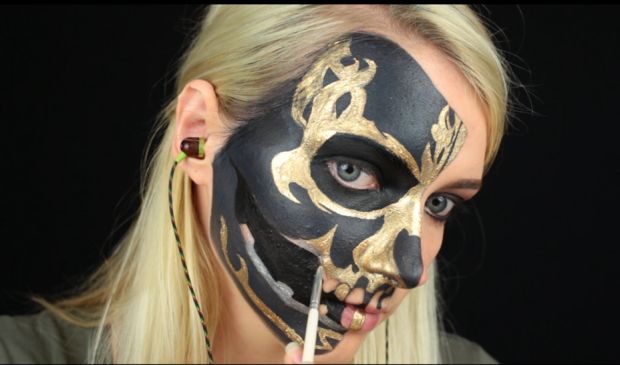
 The skull on the movie poster looks more dark grey than black, so I mixed Mehron's paradise paints together to create this colour. And with that i'm filling in half of my face. I made sure to create a crisp line at the edge of the skull part so the 'pulling the skin' effect at the end will look more real

Step 9: The Eyesocket
 Another reason why I didn't paint the skull black is because I want the eyesocket to show. If you made your skull black, the eyesocket will just blend in and won't be visible enough.

It helps to poke around your skin and feel where your real eyesocket is, and just trace that and fill it in.
there's a big chance that the paint on your eyelid will crease, so to counter that you can set it with a black eyeshadow or a translucent powder

Step 10: Adding the Details (1/3)
 With mehron's gold pigment (you mix these with a special liquid and they turn into paints) I started recreating the details. It's best to keep the example picture with you while doing this

Step 11: Adding the Details (2/3)
 Step 12: Adding the Details (2/3)
 Step 13: Filling in the Jaw
The jaw's inside is black and the edges (teeth, gums) are silver. I used mehron's silver pigment to fill these in. Some of the teeth are gold, and one tooth has a red diamond on top of it.

Step 14: Creating the Skin Pulling Effect


Alrighty, so I wanted to make it look like i'm pulling my skin and the skull underneath comes up.
For this step i kept my hand in position most of the time so i knew where the lines should be.
To create this effect you take an eyeshadow that is darker than your skintone (in my case a cold brown) and start drawing lines outwards from where your finger is. then you blend those lines towards your normal side of the face. The lines should be sharp at the skull side, and fade out towards your normal face.
Then you can highlight the spaces in between the lines with an eyeshadow that is lighter than your skin (or even a white shadow) and then your effect is complete :)

Step 15: Finished Makeup Look!

And here is the result! I also added the earring/dreadlock thingy from the poster because that just pulls it a little more together.

I am really proud of this look and i hope you liked it!

Once again if you did, you can follow me on instagram for more!  

 [Pinterest] https://www.pinterest.com/cosvvlove/
[Twitter]https://twitter.com/cosjjcom
[Instagram]https://www.instagram.com/wangxs0325/
[website]http://www.cosjj.com/
[deviantArt]http://alicestyless.deviantart.com/
Original https://bcy.net/coser/detail/118441/1431875
[Facebook] https://www.facebook.com/xiansong.wang.9

Monday, 14 August 2017

Guardians of the Galaxy Star Lord Mask Tutorial

If you are also interested in the Guardians of the Galaxy Cosplay Costumes
You could go to my website to have a look.

I'm a bored college student and instead of studying for finals like any normal student I spent my free time putting together what I think is a pretty awesome Star Lord helmet. I'm a huge Guardians of the Galaxy fan and this was built in preparation for the second movie. I took a lot of design inspiration from the first movie, the comics, YouTube tutorials, and the fact that the only thing I could afford was cardboard (And you can make the argument that that was free).

Overall I spent about $10 bucks on paint, which I will definitely use again in another project so the cost was minimal.

What I needed to build:

A lot of paper - I used regular printer paper to print off my template and to cover the whole thing with for the final layer.

Cardboard - I got a lot from some packages that were sent, large flat pieces work the best for this.

Hot Glue gun with glue

Newspaper

Soda Bottle Caps

Paint ( Metallic silver, Black, and metallic bronze)

Optional:

Plastic Straws

leds for the eyes

paint brushes and other misc. things

I made this project over the course of month while taking a full semester of classes so this wont be the most detailed build. However its crazy easy and the result is fantastic. So this instructable will definitely have something good, something bad... maybe a bit of both.

Step 1: Getting the Template and Cut Out the Cardboard


I printed off the 4 sheets and cut them out. This step was a lot of printing, cutting, sizing, and scaling. I made the entire thing slightly larger (107% if I'm not mistaken) and ended up adding a strip to the back for more width.

This is before I decided to take pictures, being a busy college student who's procrastinating studying, pictures were far away from my mind.

Step 2: Dry Fitting/ Hot Glue-ing


 I dry fit the entire thing with duct tape. Looking back I would advise against this because it ended up tearing up the cardboard as it was removed. It later was no big deal as I covered it with paper, but it was annoying none the less. I then glued everything with hot glue and this held very well. The template was able to be bent nicely to the shape of my head and was secured with glue. The second picture would fit well in the next step, but it really shows off the nice look of the hot glue.

Step 3: Paper Mache


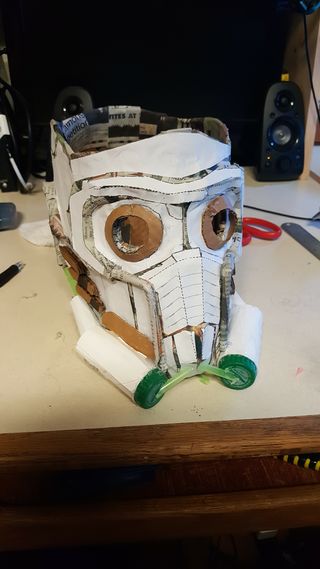
 Its at this point I started taking pictures. In any amount of free time I had I tore up little strips of newspaper and did the typical 4th grade messy paper mache with good old elmers glue and water. I covered the entire project in a few good layers and eventually covered the mask with the white paper template and a few strips of printer paper to help cover some of the newspaper print.

Step 4: Little Flourishes and Stuff

 This is where I added the eye pieces, the air cans, the tubes and the little oval shaped pieces on the cheeks. For the eye pieces I just used the cardboard template that I had cut out earlier and attached them in this step. For the air cans I used small cardboard tubes that I had rolled and glued. Attached to the top of these are soda bottle caps. The caps provided a great surface and look to the finished tube. These are attached with a small cardboard strip made to look like the bracket that holds them on. A smaller rolled up tube is sticking out of the back of these. The tubes are made either from drinking straws or from rolled up newspaper glued using paper mache, cut and bent over to match the lines and then attached with more hot glue and paper mache. The oval shaped pieces are then attached to the cheeks and the entire thing is is ready for paint!!

Step 5: MASKing and Painting


This step is where the entire thing really starts taking shape. I gave mine a good coat of black spray paint to cover up all of the exposed paper. Most of this black will get covered over later by the next layer.
The next layer included spraying the eyes and the back of the mask with copper colored paint. I made sure to cover all of the areas I new would need to be painted copper.
After drying, I asked off a section on the cheeks, the back of the head, as well as the space around the eyes. It got a pretty cool coat of silver which was cool enough to wear around like that. After drying I peeled away all of the masking tape to expose the final piece.
Because I had my paints out, I brushed on some black paint I used earlier over some of the silver to give it a gray look.

Step 6: Final Touches


Final touches included getting a sharpie out and adding lines on the face plate and adding "screws". I also cut out some plastic circles and colored them red with a dry erase marker. I later found some red sunglasses at a thrift store and was able to use the lenses from those.
I added a small amount of foam around the top of the head to make the fit more universally snug, overall it added a lot to the comfort but is totally optional. I was building this for fun and I think it turned out great, everybody who saw it could tell who I was going for and that's what I wanted. I could have been a little more careful about the paint and glue lines but in the end it looks great and I still ended up passing my classes.
Ill take a lot of this knowledge I got from this to future projects, but ya' know " I don't learn, its one of my issues".
Thanks!!

Step 7:

And there you have it. A pretty cool mask that cost about $10 bucks and almost all of that was paint. I had a lot of fun building this and one again I'd like to shout out Dali DIY for the template.